So recently I’ve been feeling super productive using nextjs for spinning up simple projects. The part that always trips me up in projects is when I need to reach for a database. There are so many options like Hasura, Fauna, Mongo, etc. I’ve played with most of these but recently I’ve been exploring supabase. It seems so easy so I’ve been wanting to try it out on a project.
I set out to build out the simplest todo list I could (because I didn’t have better ideas). I then figured I would turn it into a blog post to potentially help others.
What we will be building
We will build a simple todo list that you can follow along with. It is mainly just a proof of concept for doing CRUD actions with supabase and nextjs.
We will have a list of todo items, an ability to add new ones, complete existing ones and lastly delete them.
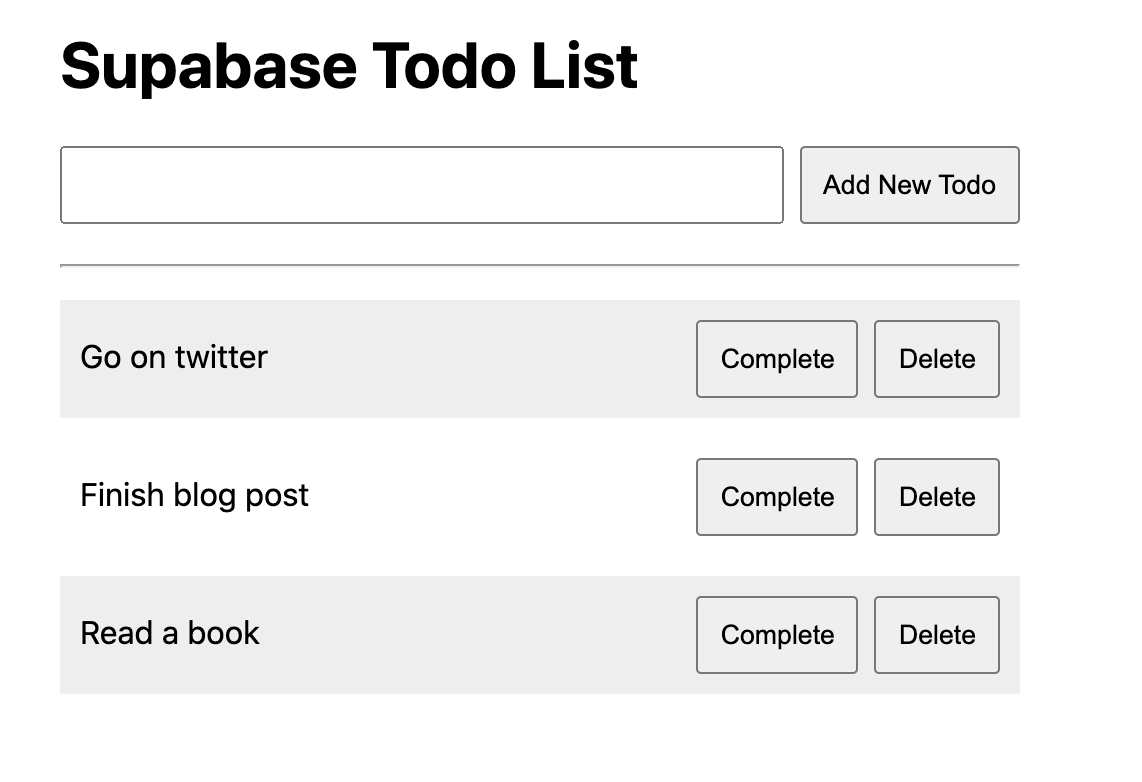
Here is an example of what the finished product looks like:
I assume a basic knowledge of React but I will try to explain the concepts as clearly as I can.
Getting started
In order to get the most out of this tutorial I would suggest you to clone down this repo.
git clone git@github.com:brenelz/supabase-todo-app.git
cd supabase-todo-app
git checkout start
There is a main branch which has all the code completed and a start branch
where I have a blank canvas complete with some jsx and css so we don’t have to
worry about that.
As an alternative you can start from a completely blank canvas if you want using
a command like the following npx create-next-app supabase-todo-app.
Tour of the start branch
package.json
The standard dependencies and scripts for a new nextjs project (next, react, react-dom)
.env.example
Contains sample environment keys that we will need to get from supabase later
on. At this moment you can duplicate this file into .env.local.
cp .env.example .env.local
Next automatically loads this file in and puts the variables in process.env
for you. Another thing to note is that for the env variables to be available on
the frontend they need to start with NEXT_PUBLIC_
styles/globals.css
Just some super basic styles to make things look a tiny bit nicer.
pages/index.js
This is where you’ll primarily be coding. I have stubbed out a few methods and written some basic jsx for you.
Setting up Supabase
Now first of all what is supabase you may ask. Like it says on the website it an open source firebase alternative. One thing I like better is it uses a postgres database instead of a nosql one which I personally am more used to.
It also has a super simple client js library that makes interacting with your data easy.
Create an account / sign in
Now you will want to go to supabase.io and sign in or create an account.
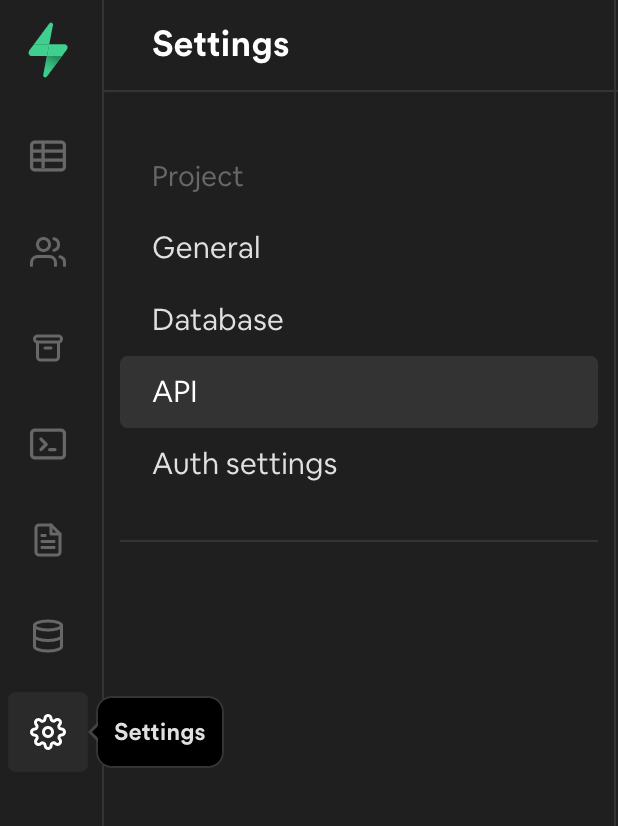
Create a new project and then go to settings, and then the api tab. Here you
will want to copy your url and put it in your .env.local file for
NEXT_PUBLIC_SUPABASE_URL. Also copy your anon public api key to
NEXT_PUBLIC_SUPABASE_ANON_KEY
Setting up db tables
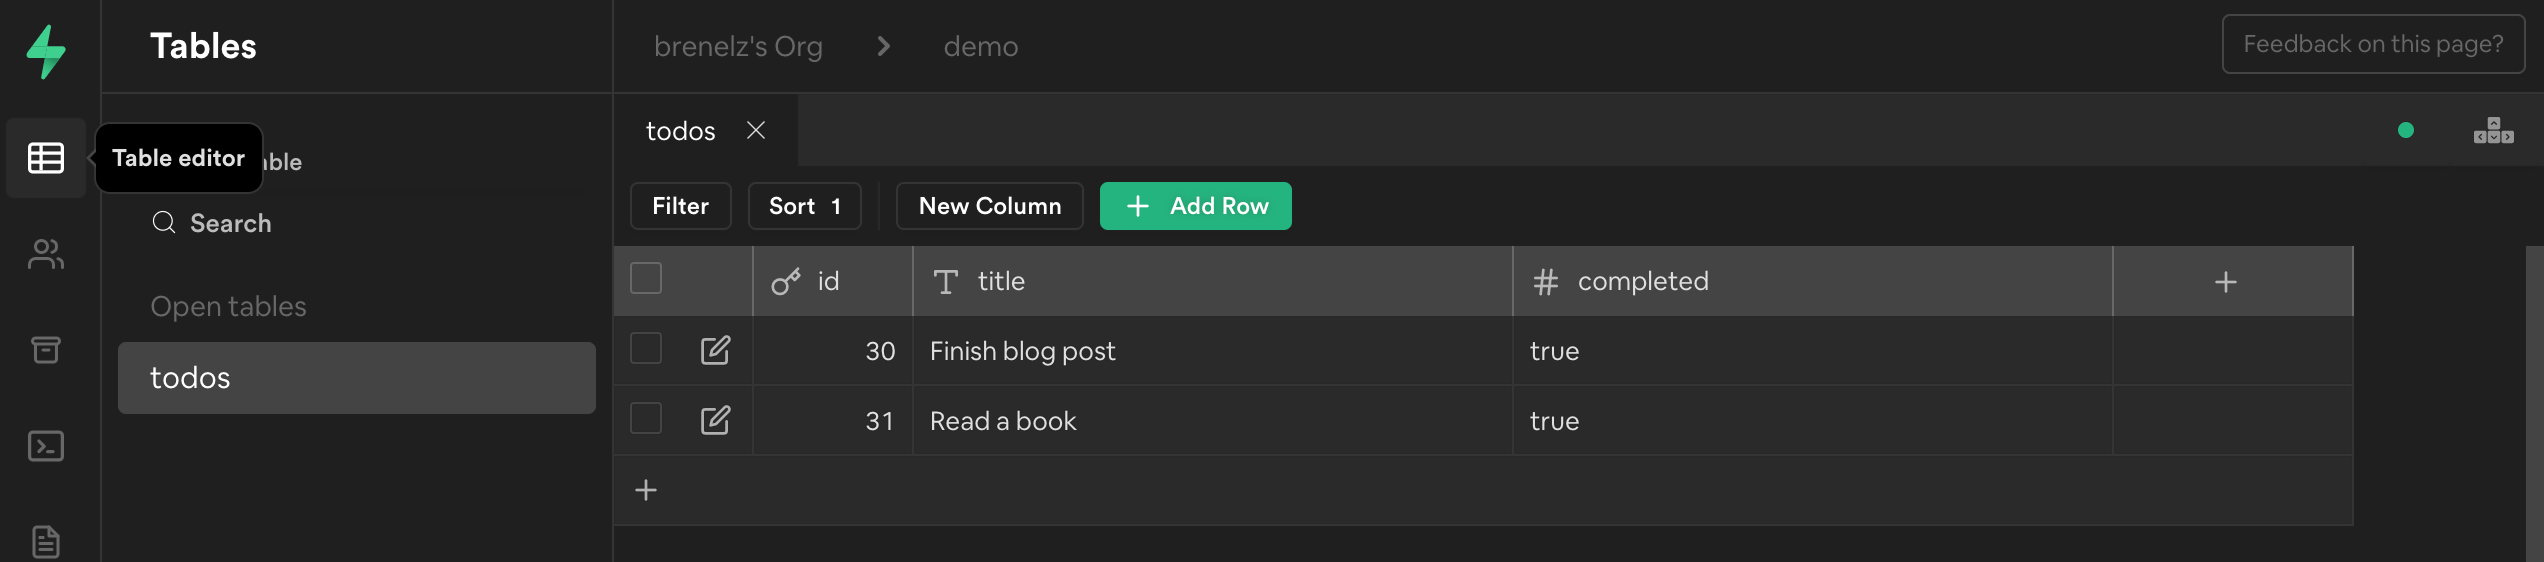
Head on over to the table editor and create a new table. Call it todos in
this case and add the following columns:
• id (primary key)
• title (text)
• completed
(bool)
Then feel free to add some todo items that we can display in our app. See how easy and intuitive this interface is? I love it!
Now Let’s get coding
Reading our todo items
Let’s install our dependencies, add the supabase client js library, as well as start the dev server using the following commands:
yarn install
yarn add @supabase/supabase-js
yarn dev
Then in a utils directory add a file called initSupabase.js with the following
contents.
import { createClient } from "@supabase/supabase-js";

const supabase = createClient(
  process.env.NEXT_PUBLIC_SUPABASE_URL,
  process.env.NEXT_PUBLIC_SUPABASE_ANON_KEY
);

export default supabase;
Then head on over to pages/index.js
Here you notice there is an allTodos variable setup for you. We will want to
pull this data in from supabase. Now here is the beauty of nextjs you can simply
export a getServerSideProps function and do server side stuff (like pull from
supabase). Let’s add the import to the top of the file and the rest of the code
at the bottom of the file:
import supabase from '../utils/initSupabase';

export async function getServerSideProps() {
  const { data } = await supabase.from("todos").select("id, title, completed");

  return {
    props: {
      todos: data,
    },
  };
}
The one thing to note is whatever you pass to the props object gets passed to your component. You can see how I am receiving it towards the top of the file:
export default function Home({ todos }) {
Just below this line one other change to make is to have allTodos point this new todos variable.
const allTodos = todos;
Now if you go back to your browser at localhost:3000 you should see the todo
items you entered from supabase. It’s that simple!
Next on the docket is building out the rest of the CRUD actions.
Adding todo items
First thing we need to do is store the state of whatever we’ve entered in the
text area. We can do this with a simple useState.
Replace const newTodo = ""; with const [newTodo, setNewTodo] = useState("");
Reminder I have already imported useState for you.
Now we need to do something with this value that we have. Let’s fill out addTodo presuming we have an api already built (we will get to this in a bit).
 const addTodo = async () => {
    const result = await fetch("/api/todos", {
      method: "POST",
      body: JSON.stringify({ newTodo }),
    });
    const data = await result.json();

    setNewTodo("");
  };
If you now hit the add button it should make the fetch call but get a 404. This is expected since we haven’t setup our api routes yet. Let’s do that.
Setup API Routes
Api routes in nextjs are as simple as creating a file in pages/api directory. In
our case we will create a funky looking file. It will be located at
pages/api/todos/[[...id]].js
This basically is a catch all route that matches any type of route like:
http://localhost:3000/api/todos
http://localhost:3000/api/todos/1
Now for dealing with POST, PUT, DELETE requests in a simple manner I like using
a library called next-connect. Stop your dev server and run:
yarn add next-connect and then yarn dev again.
Now in your api route file you created above add the following:
import nc from "next-connect";
import supabase from "../../../utils/initSupabase";

const handler = nc({
  onError: (error, req, res, next) => {
    console.log(error);
    res.status(500).end();
  },
});

handler.post(async (req, res) => {
  const { newTodo } = JSON.parse(req.body);

  const result = await supabase.from("todos").insert([{ title: newTodo }]);

  const todo = result.data[0];
  res.send({ todo });
});

export default handler;
We are using next-connect to allow us to respond to a POST request. You will also notice we are inserting our newTodo param we passed in the body to supabase and then returning that updated record back.
If you go back to your app and try and add an item what happens? It appears like nothing but if you refresh the page they show up. This is because the POST request is successful but we aren’t yet doing anything with the data returned from it.
Head back over to pages/index.js. We need to setup another useState hook that
defaults to the todos passed from the getServerSideProps function but one that
we can update with data when it comes back from our api.
Replace const allTodos = todos; with
const [allTodos, setTodos] = useState(todos || []);
Then we can modify the addTodo funtion using setTodos and the spread operator.
const addTodo = async () => {
    const result = await fetch("/api/todos", {
      method: "POST",
      body: JSON.stringify({ newTodo }),
    });
    const data = await result.json();

    setNewTodo("");

    // this is the new line we need to add
    setTodos((state) => [...state, data.todo]);
  };
Now when you go back and add a todo it will show up as expected.
Building out the rest of our api
Back in api/pages/todos/[[...id]].js add the following code to the bottom of
the file above the export default handler
handler.put(async (req, res) => {
  const { completed } = JSON.parse(req.body);

  const result = await supabase
    .from("todos")
    .update({ completed })
    .match({ id: req.query.id });

  const todo = result.data[0];

  res.send({ todo });
});

handler.delete(async (req, res) => {
  const result = await supabase
    .from("todos")
    .delete()
    .match({ id: req.query.id });

  const todo = result.data[0];

  res.send({ todo });
});
These api routes don’t really show anything to new outside of how to delete and
update using the supabase client library. One thing to note is the use of
handler.put and handler.delete. Also you can pull the query parameter off
the request by using req.query.id.
Finishing off the functionality
Now back in pages/index.js fill out the missing functions with the below. They
are not too different from adding a todo.
const completeTodo = async (id) => {
    const result = await fetch("/api/todos/" + id, {
      method: "PUT",
      body: JSON.stringify({ completed: true }),
    });
    const data = await result.json();

    setTodos((state) =>
      state.map((todo) => (todo.id !== data.todo.id ? todo : data.todo))
    );
  };

 const deleteTodo = async (id) => {
    const result = await fetch("/api/todos/" + id, {
      method: "DELETE",
    });
    const data = await result.json();

    setTodos((state) => state.filter((todo) => todo.id !== data.todo.id));
  };
Now when you go back to your app you should be able to complete todos which show as a strikethrough and you can also delete them. Remember these changes are all persisting to the backend in supabase which is super cool!
The one thing to note here is how we are calling setTodos. For updating the todos we map over them and match up by id to determine if we should replace it or not. For deleting we just filter out the one we just deleted.
Conclusion
I know this has been a bit of a long post… probably one of the longer ones I have ever done. I hope you’ve picked up some neat tricks. I feel like nextjs and supabase make a great stack for prototyping projects in a quick manner. Obviously at larger scales this might not work as great for you.
Other features that supabase has is auth which I also really want to play with. It seems quite a bit easier than alternatives like Auth0 and even NextAuth.
Another thing they just released is supabase storage which I haven’t looked at much.
Hope you enjoyed this, and remember you can view the finished repo and even deploy to netlify if you like.